Getting Started
This project is built using Nix, which makes getting started quite easy - all you have to do is install Nix and direnv, and they take care of the rest.
Whilst this page will get you started, it is strongly recommended that you read through
First-time Setup
If you're on a Debian-based distro (like Ubuntu), you can run the member-setup.sh script, which will automatically set everything up for you. If you're not or you just want to, you can go through the steps manually (but you'll have to adjust the apt commands to suit your distro).
Curl script
First, make sure you have curl installed:
Then, you can run this command (it will prompt you for sudo permissions):
curl https://raw.githubusercontent.com/ROAR-QUTRC/perseus-v2/refs/heads/main/software/scripts/member-setup.sh | bash
Which automates the manual process described below. After you run this command, you may need to restart your shell to ensure direnv loads properly.
The script clones the repo into your home directory (~), so if you want it installed elsewhere, you should do it manually.
Manual
- Install the GitHub CLI.
- Run the following shell commands to install
curlanddirenv(this assumes a Debian-based distro like Ubuntu):
```{code-block} console sudo apt-get update sudo apt-get install -y gh git curl direnv
3. Log into GitHub: `gh auth login -w -p https`
4. Clone (means to download a copy from the server to your machine) the repository (often referred to as repo) into `~/perseus-v2` and `cd` (change directory) into it:

```{code-block} console
cd ~
gh repo clone ROAR-QUTRC/perseus-v2
cd perseus-v2
- Run the setup script (it will prompt you for sudo permissions):
```{code-block} console ./software/scripts/nix-setup.sh
6. Skip this step if it ran without errors. If the script failed to run and suggests running with `--no-confirm`, try again like this:

```{code-block} console
./software/scripts/nix-setup.sh --no-confirm
- Accept all config options when prompted by typing
y, then press enter - Restart your shell
- Run
cd ~/perseus-v2 - Wait for the downloads (and potentially builds)
- If asked, accept all config options with
y - Run
nix build- this will attempt to build the workspace. If this succeeds, you're done, and the built workspace is now available under the./resultfolder! - If asked, accept all config options with
y
IDE Setup
VSCode (recommended)
Open the perseus-v2/perseus-v2.code-workspace workspace file (File/Open Workspace from File) and install all the recommended extensions.
This will install language support extensions (Python and C++), an extension for the formatter in use (treefmt - configured using treefmt-nix), and configure VSCode to respect the project settings.
:::{important}
You specifically need to open the perseus-v2.code-workspace file, not the folder, as otherwise settings won't apply.
In the event that you open the folder by mistake, VSCode will prompt you to open the workspace file:
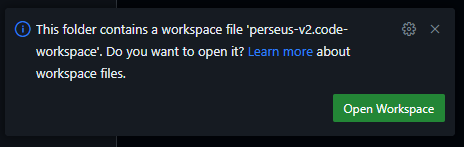
Once you've opened the workspace, you should see (WORKSPACE) in your explorer (file view) title.
:::
Unfortunately, due to limitations in how treefmt works, it can only format files on save - this is fine, don't worry if you hit format and nothing happens.
Save it and try again!
At this point, you're all set up and ready to go.
Other (I)DEs
In the event that you're using another editor, you probably have enough technical know-how to set it up yourself.
As long as it uses the environment variables from the direnv setup, it should be able to find and run everything.
You should also configure your editor to use treefmt as its formatter - if you're using direnv or you're in a nix develop environment (see the next sections), it (and the formatters it uses internally) will already be available in your shell.
Finally, you should configure your C/C++ LSP provider to recursively search in ${ROS_WORKSPACE_ENV_PATH}/include 1 as part of its include path.
:::{example}
VSCode is configured with the include path ${env:ROS_WORKSPACE_ENV_PATH}/include/** added.
${env:...} tells it to substitute the value of that environment variable as-is, the /include/ is simply directing it to the correct subdirectory, and finally ** tells it to recursively search through all directories for files to include.
:::
:::{note}
You don't need to do anything Python support - the workspace sets PYTHONPATH by default.
:::
Building the software
Run nix build.
That's it.
No, really.
If that succeeds, that means that the entire project built successfully and you can now use it.
However, at this point, it's not available on your shell - nix build creates a symlink named result in your current working directory which links to whatever you just built.
If, instead, you want to build the software and have it available to you, run nix shell instead.
After this runs, you'll be dropped into a sub-shell with the built rover packages available to you.
:::{note}
:name: setup-autocomplete
Unfortunately, nix shell can't set up autocomplete for ROS2 commands - if you want this functionality (which you should!) either run eval "$(mk-workspace-shell-setup)" or source software/scripts/autocomplete.sh (the path for the latter assumes you're in the repository root) after entering the subshell.
:::
At this point, you can run standard ROS2 commands, and all the rover packages are available like they've been installed.
Developing Software
direnv automatically makes all the tools you need available to you when you cd into the repo.
Like nix shell however, it unfortunately can't set up autocomplete, so you'll need to set it up just like above every time you enter the directory.
However, if you don't like direnv - or you don't want to set up autocomplete - you can alternatively run nix develop to be dropped into a bash shell with everything fully set up, including autocomplete.
In this environment, you can either run nix build to build the entire workspace, or you can cd to the ROS workspace root software/ros_ws and run colcon build just like you're developing in a standard ROS2 environment.
:::{important}
You must always run colcon inside the workspace root software/ros_ws, otherwise the configuration file may not apply properly.
:::
:::{note}
To the experienced ROS2 developers - you may notice the lack of a --symlink-install flag on the colcon build command - that's because it's configured using a colcon_defaults.yaml file present at software/ros_ws/colcon_defaults.yaml which adds this flag by default.
:::
Before you start
However, before you start writing code, there's a few things you need to read through first. The most important one is the software systems, which goes over how all the software links together and how it's laid out. The other document is the software standards, which details the standards to which your software is expected to be written. If your software doesn't meet these standards, we unfortunately won't be able to merge your changes until you fix the issues - if code standards aren't enforced, the code will quickly become an un-maintainable mess, leading to another rewrite.
Debugging
ROS2 Nodes can't see each other on the network
Use the talker and listener nodes from the demo_nodes_cpp package to test this, with the talker on one device and the listener on another.
For some reason, the ros2 multicast commands mentioned in the standard ROS troubleshooting guide use a different port to the actual ROS2 DDS communications layer, and as such is not a reliable way to test - hence the use of talker and listener nodes.
This is almost certainly caused by firewall issues - specifically, blocking DDS discovery.
To allow ROS2 through the firewall on a system managed with ufw, run the following commands:
{code-block} console
sudo ufw allow in proto udp to 224.0.0.0/4
sudo ufw allow in proto udp from 224.0.0.0/4
If you're on a system with a firewall not managed by ufw, you probably already know how to do this yourself.
You need to allow UDP traffic to and from the address 224.0.0.0 with a mask of 4 bits (hence 224.0.0.0/4), as this is the mask for multicast addresses.
:::{note}
In some cases, you may need to allow specific UDP ports through the firewall as well - if you're still having issues, let us know!
We'll help you debug it.
You can find a calculator for the ports in use here - just make sure to plug in the correct domain ID, as per the next section.
:::
I installed ROS2 the normal way!
Firstly, you should really be using the Nix setup as it manages dependencies for you automatically.
It coexists perfectly happily with a standard ROS install, as it takes priority over your normal system-installed packages.
Secondly, you will probably probably experience ROS_DOMAIN_ID mismatches - this project defaults the ROS_DOMAIN_ID to 51 for development, and 42 for production deployment, since this ensures that packages in development can't interfere with those running on the rover.
:::{note}
If you set the ROS_DOMAIN_ID environment variable manually, it will be used instead of the defaults in the dev shell.
:::
Setup script details
For the curious among you, the nix-setup.sh script, in order:
- Sets up git submodules (should never be necessary, but better to have it and not need it)
- Installs Nix
- Configures Nix to allow your user to configure it (adds you to
trusted-users) % TODO: This needs to be changed - the repo Cachix paths should be added totrusted-substitutersinstead, sincetrusted-usersapparently has many security issues. - Adds
direnvsetup to your.zshrcand.bashrcfiles - Allows
direnvto configure based on the.envrcfile present in this directory - Configures
direnvto silence absurdly long info messages on activation 2
:::{warning}
This script cannot set up direnv if you're not using bash or zsh as your shell!
You'll have to set up the hook yourself according to its docs, or use nix develop instead (see Developing).
:::
It's also designed to be able to run multiple times if something goes wrong - it checks if the modifications it makes are already present, and if it detects them, skips that step.
-
ROS_WORKSPACE_ENV_PATHis an environment variable which gets set containing the path to the ROS environment in the Nix store. It contains all the tools and dependencies which get made available in the development environment. ↩ -
This requires a modern version of
direnv- if you see a text wall when it activates, you probably need a newer version. The standard version shipped with Ubuntu 22.04 is unfortunately too old for this to work. ↩